INTRODUCTION TO PLAY PIERCING
What is Play Piercing?
Play piercing is the temporary subdermal insertion of sterile hypodermic needles for pleasure and pain.
Play piercing is an activity appropriate to the deeper explorations of the connections between skin, psyche and soul. It is both vehicle and destination; it stands alone as a recreational activity or may be incorporated in ritual. It's one of those things that appears simple, even easy, on the outside but reveals startling complexity on closer examination.
Chemically, play piercing triggers a deep-seated survival response abetted by a spike in brain chemical production. Your skinsuit perceives a threat, rushes itself with adrenaline and endorphins in preparation of a fight or a flight. If needed, extra resources for survival would be available. In the absence of a "real" threat, we get to sit back, relax and enjoy the rush.
Play piercing is done for pain, for pleasure, for transcendent experience. It is done for bloodletting, for the opportunity to play with and consume that powerful, sacred elixir of life. It is done for decoration, from the patterning of needles to additions of dangly bits to lacing and "corsetry." It's done for the temporary modification of the body, a stitched reconfiguration of parts that is pleasing to the eye or to the senses. It is versatile, potent and lends itself well to a variety of applications, from algolagnia to artistry.
Play Piercing Isn't for Everyone
If you are diabetic, immune-suppressed, have a blood clotting disorder (i.e., hemophilia), a seizure disorder or vascular disorder, you'll want to research your condition and the possible impacts of play piercing before making an informed choice about participating in this activity. Likewise, if you are taking any drugs, from aspirin to prescription medication, that thin the blood, slow coagulation and encourage bleeding you'll want to acquire the information necessary to make an informed choice. Herbs like motherwort have the same action. If you're pregnant or nursing, exercise extreme care and make a deeply informed choice.
If you have a bloodborne illness such as Hepatitis C, Lyme disease or HIV (to name just a few of the many), make certain to tell your partner so that they can make an informed choice and take the appropriate precautions.
Risks:
• Infection
• Bruising (subcutaneous hematoma)
• Nicking a nerve or disrupting a nerve cluster
• Bloodborne pathogens STI’s and other bloodborne risks such as Lyme disease, Ebola and tick-borne Encephalitis albeit much less likely to occur.
Sizes & Gauges
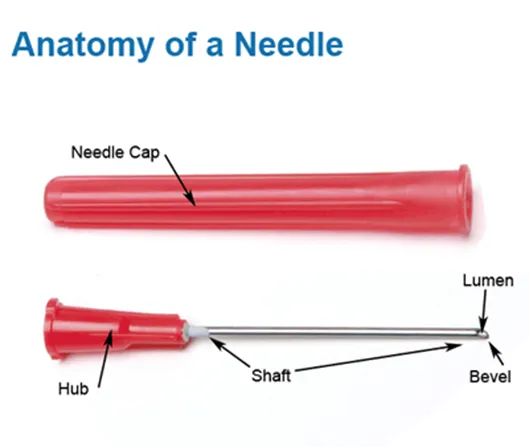
The smaller the gauge of a needle, the higher the number. Twenty-seven gauge needles are very fine and thin; for some piercings, they're too flimsy and are far too bendy for pendants or anything hanging from the piercing. The gauges of generally available hypodermic needles from smallest to largest are: 27, 25,23, 22, 21, 20, 19, 18, 16, with 16 being quite large for play piercing. Individual preferences will vary, but the average play piercing needles is 1.5 inches long and gauged at 23 or 25.
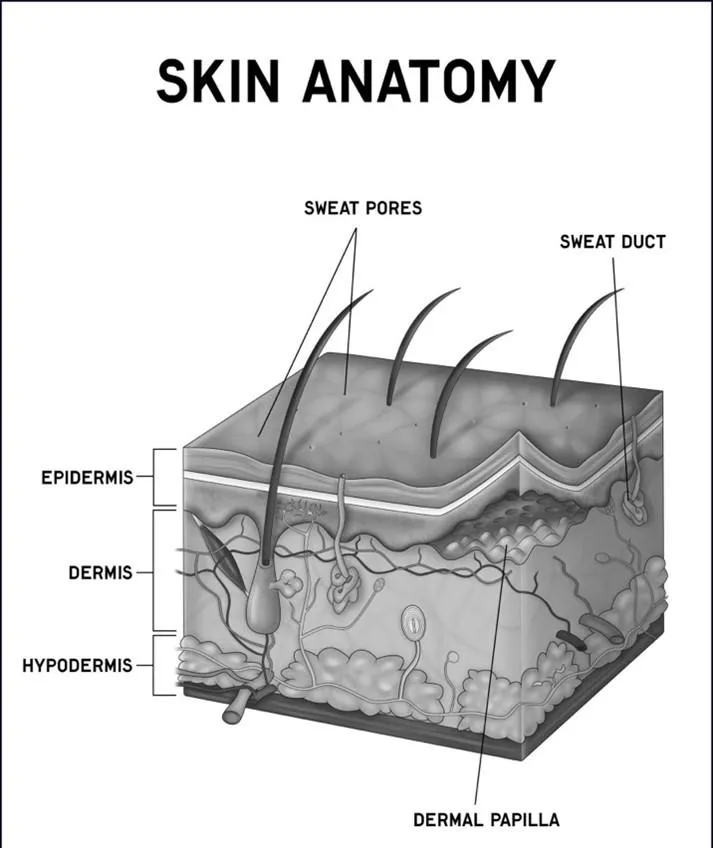
Play piercings generally go through all three layers of the skin, with the majority of the shaft embedded in the subcutaneous tissue, but depth can be adjusted for sensation. Shallow piercings are sharper and higher pitched; deeper piercings have more of a low, resonant thrum to them. On average, the depth of a good piercing is between 1/16 and 1/8 of an inch (16.5-33 mm). The variety of sensation at different depths renders the skin much like an instrument to be played, an instrument with great range under finesse.

Setting Up/Cleaning
Even if you don't use them all you'll want to have the following items on hand:
• Surface disinfectant
• Alcohol prep pads or other skin disinfectant
• Fresh, clean gloves made from a material non-allergenic to your playmate(s)
• An assortment of needles in the appropriate length and gauge for your scene
• Surgical marking pen (other ink pens can be used, but never gel ink) • Lubricant (topical antibiotic/anti-infective like Neosporin, Polysporin, bacitracin — generics are fine, but always ask your playmate about allergies)
• Rubber corks, size 000 or 00 or hatpin clutches (both can be sterilized in an autoclave; regular cork will do in a pinch)
• Paper towel, cotton balls and/or gauze squares for prep and clean up
• Peroxide in a squirt bottle for runners and blood clean up (it makes nifty bubbles and gets warm)
•Thimble (to prevent sticks)
• Sharps container (a "real" one or a heavy-duty plastic bottle with a lid)
• Trash Receptacle
• Bandages
Insertion

Cleanliness during insertion will help minimize the risk of infection. Remember: clean things that touch dirty things are no longer clean. Open boxes and packages ahead of time. Lay things out within reach and think ahead to avoid cross-contamination. Re-glove more often than you think you need to.
There's two ways to insert a needle: smooth and easy or abrupt and hurty. Begin by doing smooth, controlled inserts; expand on that technique once you've mastered it.
Next, clean the piercee's skin. Starting at the center of your piercing area, apply your cleanser. While you're cleaning by wiping the skin in an outward spiral motion, look at the skin you're about to puncture. Are there moles, skin tags, scabs, bruises or scars that you'll need to avoid? If you use alcohol, keep in mind that evaporating alcohol chills skin and can cause puckering. Wait for the skin to relax before you pierce. If you're using non-sterile exam gloves, change them after cleaning the piercee's skin.
You might find it helpful to mark your entry and exit with a surgical pen the first few times. It helps to train your eyes to the dimensions that will eventually become automatic.
Whether you mark or simply make note of where you want the entry and exit points to be, position your fingers just to the outside of those spots. Pinch your fingers close enough together to create a firm rise in the skin, but not so hard that you hurt the piercee (unless you want to, of course). Align the needle so that the tip is bezel up, and the shaft is perpendicular to your fingertips. Make sure your horizontal line (the line between the entry and exit points) is where you want it, especially if you're doing patterning. Make sure that your vertical line is parallel to the skin itself. Otherwise, one end of the piercing will be deeper than the other; that sort of leverage increases the chance of tearing. It may be helpful to maintain eye contact and trying to sync breaths to increase oxygen in the bloodstream, enhancing sensation and aiding in pain processing.
At this point you’re good to push the needle through the skin. Push firmly and gently. Go slowly, smoothly, evenly, watching the needle move beneath the skin as it heads towards the exit point. The needle is sliding through the fatty layer during this stage of the piercing and there's very little pain. The first piercings generally hurt more than subsequent ones; it can take a few to get the endorphins rushing well. Piercing the exit is usually more painful than the entry because the skin is more stretched. Before you break skin at the exit, make sure the needle's point is where you want it to be. You'll be able to tell if you're on your mark by the way the needle distends the tissue. Get your fingers out of the way and make the exit. If you're using a cork or the casing to brace your exit, push the needle through the exit point and into the cork or casing.
Removal
Always brace the entry (the place where the needle went in first) when you remove a needle. It's a tight fit, that needle under the skin, made tighter by the pressure of inflammation, and pulling on the needle drags tissue. Hold the hub, and use your thumb or forefinger to apply gentle pressure beneath the needle. With practice, you'll learn how much pressure to apply to keep the skin balanced between the extraction and the bracing.
If you feel nice, grab the hub, make sure your trajectory is a straight line, and pull quickly but firmly. To prolong the magic of a gentle removal, pull slowly and evenly. If you feel mean, grab the hub, tip it, and pull really fast.
Tipping the hub scores the tissue along the path of removal, causing more pain and better bleeding. Because a hard or tipped removal with scoring adds to the pain, it may trigger one last endorphin rush (if there are any left to be released).
Once the needle is out of the skin, immediately dispose of it in a sharp’s container or heavy-duty plastic bottle with a lid. Sharps containers can be purchased in a variety of sizes at drug and medical supply stores, or ordered online. In lieu of a sharps container, use a heavy-duty plastic bottle with a lid (something like what fabric softener and detergent come in) and put used needles in it. When it's full, duct tape the lid shut and clearly mark it with "sharps" and "biohazard." You can then take it to your local waste management plant or landfill for disposal. In some places, pharmacies will accept full sharps containers for disposal and even exchange the old for a new.
Apply pressure to any spots that are bleeding (most bleeding will stop in under 5 mins)
Clean with sterile saline wipes, rubbing alcohol or hydrogen peroxide
After Care
Offering water, snack and possibly a blanket as a drop in endorphins can cause shivering is the best form of aftercare. Of course, you would have negotiated beforehand what that will look like, but options for warmth, hydration and some protein and fructose help the body recover.
Medical Attention is Required if:
• you get a bleeder that won’t stop
• A bruise turns into a knot beneath the skin and continues to swell for more than a couple of hours and doesn't respond to ice or anti-inflammatories.
• A hole you thought was closed become hot, red and/or inflamed and is accompanied by swelling, an odd yellow or greenish discharge, a funny smell or a fever.
• You notice a line of redness leading away from the piercing site; it's an indication of blood poisoning.
• You experience continued, prolonged neurological (nerve) pain emanating from or connected to a piercing site.
• A needle or fishing line rips through the skin and stitches are required. A wound may be irrigated and bandaged with Steri Strips at home if it is no deeper than the dermis, not over a joint, is not contaminated and is no more than ½" - ¾" in length. Watch closely and carefully for signs of infection. If in doubt, seek medical attention.
